It's All About Food
Everyday Meals Idea - Simple & Easy
It's All About Food
Everyday Meal Ideas - Simple & Easy
Sugar Cookies – Frozen Theme

My girl’s just love frozen, I am sure most of the young girls do. It’s something about that movie that they can watch it and listen to the songs numerous times. My little one sometimes watches the movie 3 times back to back.. Literally 3 times.. And just because I am around I have too seen the movie more than I should have.
My elder daughter Amaira calls herself Princess Elsa, she’s got Elsa dress, Elsa wand, Elsa shoes, Frozen bag & bottle, books, dolls and don’t even recall what all she has. She is my princess and my princess turned four on 1st July. So I wanted to make cookies for her kinder friends, of course the cookies had to be frozen themed.
This is my first attempt to make sugar cookies based on the theme with the help of my dear friend Ayse. Ayse has been an inspiration for me when it comes to baking and we have together done loads of baking especially for kids. Thanks Ayse!!
I would soon be making frozen theme cakes and more character cookies, which I would be sharing soon.
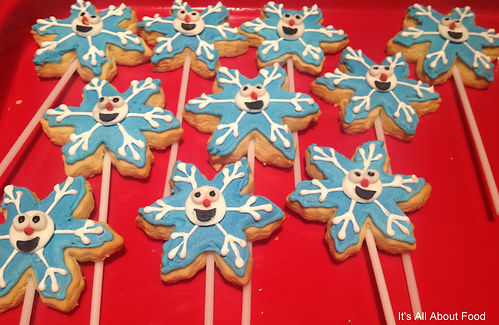
I have incorporated the snowflakes and Olaf together. The base is the sugar cookies, and I have used royal icing for the icing and fondant to make Olaf.


Knead the dough as per the recipe, cut of the cookies using snowflake cutter and bake them. Make sure to roll out the dough a little thick as we need thick cookies and the consistency should be even.

Once the cookies are done immediately transfer them on cooling rack and insert the Popsicle sticks. Make sure you do it when cookies are hot or else they might break later or it would be hard to insert the sticks. Let the cookies cool down completely, which would take around 20-30 minutes.

Make the royal icing mix as per the packet instruction, add the desired colour. On the packet it said 50 ml water for the whole lot, but I had to add more water as it was hard to push the mix through the piping bag.
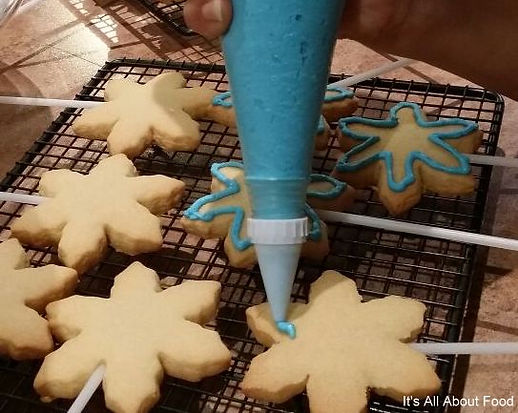

So I further added more 60 ml and then filled my piping bag to give the cookies border. Make sure the consistency is little hard so the border stays.
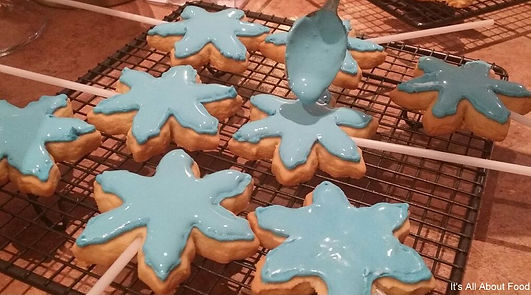
Once the borders were done I added more water to the royal icing to make it to a pourable consistency, so that when I pour the icing between the borders it follow a bit, but not runny consistency. Must have added further 100 ml of water to it. Remember when you add water to the royal icing the colour would become lighter than the one you used for border, so add more colour about 2 drops and try to match and check.With a spoon pour the icing mix on the cookie and spread it evenly to give a smooth texture. Once done let the cookies dry over night.
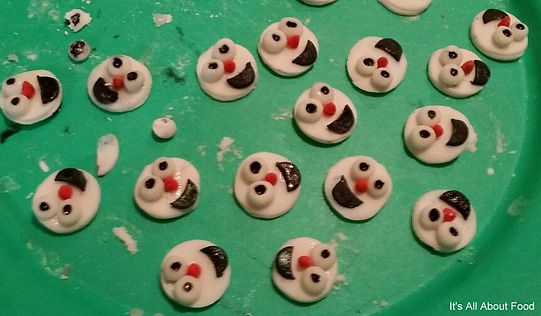
To make Olaf I have used fondant, very simple and easy to make this.

Next lot of royal icing needs to be white in colour so, again make the icing according to the packet instructions and add more water to get it to same consistency as we had for the border. Fill the piping bag and make designs on the cookie, when wet stick the fondant Olaf on it, as the icing is wet fondant will stick to it.


I had few extra cookies, so decorated them without Olaf face.


Done, if you want to do as I did use transparent cello wraps and ties to pack them and make them look fancier.
Thanks for stopping by.
-
Servings: 28-30 cookies
-
Difficulty: Medium
Ingredients for cookie:
3 cups all – purpose flour
1 cup unsalted butter, softened
1 cup sugar
¾ tsp soda bi-carb
¼ tsp salt
1 egg
1 tbsp milk
Ingredients for Icing:
2 packet – Royal Icing Water
Food colours
Fondant
Method for making cookie:
-
In the bowl sift together flour, salt, soda bi-carb and keep it aside
-
In an electric mixture bowl add butter and sugar and mix till sugar and butter completely dissolves and is soft and fluffy.
-
Then add milk and egg and beat further to combine them all.
-
On a low setting, gradually add flour and keep mixing it till the flour pulls parts from the sides and forms soft dough.
-
Once the dough is ready wrap it in cling wrap till in use or else it might get hard.
-
Put a baking sheet on the working surface and use half quantity of the dough and keep on it.
-
Roll the dough to get required thickness, please make sure the thickness is even throughout.
-
Keep it little thick as we need to insert popsicles later.
-
Cut the dough with the snowflake shaped cookie cutter. Make sure you keep at least 1 inch space between the cookies, as cookies after baking would expand and if close enough would stick to each other. Once you have made the shapes, remove the excess dough and place the baking sheet directly on the baking tray.
-
It’s better not to transfer cookies from working surface to tray, they might break so roll the dough on the baking paper you can use it in the oven.
-
Pre heat oven at 190° and place the cookie tray in it.
-
My recipe told me to keep cookies in the oven for 7 to 9 minutes, but I had to keep them a little longer to get the desired colour and for them to cook through, so 12 minutes was ideal for me.
-
As soon the cookies are done remove from oven and immediately transfer them on the cooling rack.
-
Insert Popsicle sticks when cookies are hot and then let them cool for around 30 minutes.
Method for decorating the cookie:
-
I have used fondant to make the Olaf face, I rolled out white fondant and with help of small circle cutter made the face.
-
Just by taking some white fondant and rolling with fingers I have made the eye, and have used black food colour for the pupils.
-
Orange fondant for the nose and black for the mouth. I put them all together using some icing sugar to stick.
-
Make the royal icing mixture as per the packet instructions. And add the desired food colouring to it.
-
I had to add more water than indicated on the packet, to get a consistency which was thick enough for the border and was easy to push from the piping bag.
-
Make the borders of the cookie and then pour back the remaining icing in the bowl and further add more water to make it to a little more pourable consistency to fill in the inside of the cookie.
-
Pour the icing inside the borders with spoon and spread them evenly, making sure you get a smooth texture and let the cookie try from 4 hour to overnight.
-
Once the cookies were dried, Using the white icing sugar, make the snowflake pattern and when the icing is wet place the Olaf face on it and gently press down, as the icing is when the fondant will bind together well..
-
Hola!! The frozen cookies are done and I am sure the priceless smiles you would see on your kids face would be the reward.
Tips:
-
Make sure you work quickly with the dough before it dries out.
-
Same with icing sugar, if icing sugar is kept for long, it start gets layers on it.
-
If the Popsicle sticks come out, dip it in the icing sugar and insert it again.
-
I have used clear cello paper and fancy ties to wrap the cookies.